BLOGS Around the Home: Crafting Fall Pumpkins
By Chip Kouri
Source: Times Record News
The Summer of 2019 is flying by. It seems like it was just yesterday we were celebrating Memorial Day and now, in just a few short weeks, we will be celebrating Labor Day!
Once August rolls around, I, like many others, start to look forward to autumn. Changing of the leaves, somewhat cooler days and pumpkin spice flavored items everywhere! It is at this time of year I also start thinking about how I am going to arrange my home and what kind of decor I will use for fall decorating.
Of course, pumpkins play a huge role in fall decorating. They are wonderful to put on a porch, accent a flowerbed or gather on a mantel. Problem is, real pumpkins tend to rot and fall apart or get eaten by local wildlife, while the fake pumpkins available at the craft store can cost upwards of $60 or more.
While it is still a bit early to put out these decorations, now is the time to craft them so they will be done when you are ready to decorate for the upcoming season. I have a couple of easy, inexpensive pumpkin DIYs that you can make in an afternoon and even get the kiddos involved, so let’s get started!
Dryer Vent Duct Pumpkins
Materials needed:
Dryer vent duct (The flexible kind. NOT the semi-flexible kind) Mine was 4″x 8′)
Scissors
Wire cutters or pliers
Small zip ties
Spray paint in your choice of colors
Step 1: Stretch the duct out straight and using your scissors and wire cutters, cut your duct work into 1 1/2 to 2 foot sections, leaving the wire supports in tact at each end.
Step 3: Spray paint in your choice of color. Let dry completely.
Step 4: Once dry,use a hot glue gun or regular glue and embellish however you like. I used twigs from my yard, silk leaves and flowers and even some green Easter grass. Use your imagination to make yours unique. Once the glue is dry, use them in your Fall home decorating scheme how you see fit. These are weatherproof, so they may also be used outdoors.
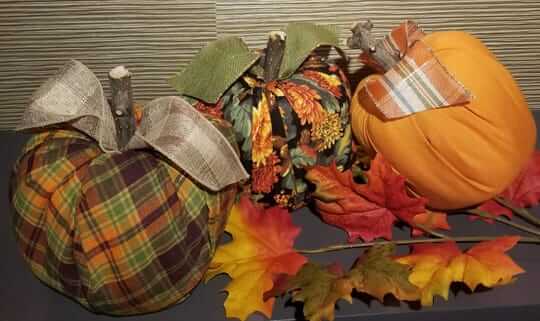
Bath Tissue Pumpkins
Materials needed:
Rolls of bathroom tissue
Roll of quilting batting (available at local craft or fabric stores)
Large fabric scraps of your choice
Scissors
Embellishments
Step 1: This project is so quick and easy, you just might make many, many of these! Unroll your quilting batting and using your scissors, cut a square about 18″x18″. This may need to be a little larger or a little smaller, depending on the size of your roll of tissue.
You may use multiple layers of the batting to give the pumpkin a fatter look. I stacked two layers together for each of the pumpkins I made. Cut your fabric into a square slightly larger than your batting. These items may also be cut into circles, just make sure there is enough to cover your finished product.
Step 2: Place a roll of tissue in the center of your batting, hole side up. Begin folding the batting up and over the roll of tissue, pleating the sides as you go, and stuffing the ends into the roll. Once covered in batting, follow the same steps with your fabric, making sure to cover all the batting. Sometimes it is helpful to use the handle of a wooden spoon to pack the layers of batting and fabric inside the tissue roll.
Step 3: Decorate! I kept mine very simple and just used a stick from the yard as a stem and added seasonal ribbon as “leaves”. And that’s it! Once the season is over, you can store these as they are or unwrap them, store the batting and fabric and use the tissue! Of course, these are for indoor use, only.
So, you see, with just a few materials and some imagination, you can create some very unique, festive and inexpensive pumpkins to add to you Fall decorations this year. I hope you all give these a try!
Happy crafting!